

What Sketch & 3D View does
To go from SketchUp to a photoreal render with AI, export one view from your model, upload it to Sketch & 3D View, set the store type and finish, and press Generate. With the layout setting on Precise, the render keeps your camera, walls, openings and fixture positions. It changes the materials, lighting and product so the image reads as a photograph. The tool estimates 30 to 60 seconds.
It is built for designers who have a model or a sketch and need an image for a client conversation today, not after a render queue. It takes a view from SketchUp, 3ds Max, Revit or Lumion, or a hand or digital sketch. If you start from a photo instead, use Store Interior or Redesign a Space in the same Tools workspace.
What you get from it
- Your geometry stays put. On Precise, the instruction is to keep the exact camera, walls, openings and fixture positions. You are not asking AI to design the store again, only to finish it.
- It starts from rough input. A clay-white model view or a marker sketch both work. A chip called “Your input is” lets you say which one you uploaded, so the tool knows whether it is reading a model or a drawing.
- The finish is yours to steer. Choose a store type, a design style, light (day, golden hour, evening or night), and whether shoppers appear. Your own words in the prompt come last, so they outweigh the presets.
- You choose the look of the image. Render style offers Photoreal, CGI, Sketch and Watercolor, so the same view can be a client-ready photo or a softer concept image.
- Product is generic and unbranded. Fixtures can be merchandised with goods that suit the store type, and signage stays blank unless you name your brand. Nothing invented ends up in front of your client.
- It is quick enough to try options. A render costs 25 credits, so you can test two or three finish directions on one view before you commit to a long render.
How to use it, step by step
- Export a view. In SketchUp, 3ds Max, Revit or Lumion, frame the camera you want to show and export an image. Or photograph or scan a sketch.
- Open the tool. In the Tools workspace, choose Sketch & 3D View and upload the image under Input image.
- Set “Your input is” to 3D model view or Sketch.
- Pick the store type and design style. The store type decides which product appears on the fixtures. Footwear gets shoes, not bags.
- Choose the Render style (Photoreal, CGI, Sketch or Watercolor) and set Follow my layout. Precise keeps your geometry. Creative treats the view as a guide.
- Set Light, People and Merchandise. Merchandise set to Empty leaves fixtures bare; the other settings stock them with generic product.
- Write the prompt with materials, lighting and floor, then press Generate. The Fast engine is on paid plans only.
Try this prompt: “Walnut fixtures, warm 3000K lighting, polished concrete floor.” Your input is: 3D model view · Store type: Footwear · Design style: Warm natural · Render style: Photoreal · Follow my layout: Precise · Light: Day · People: None · Merchandise: Stocked.
If one detail is wrong afterwards, such as the floor, open the result in Edit Image and change only that.
A real example
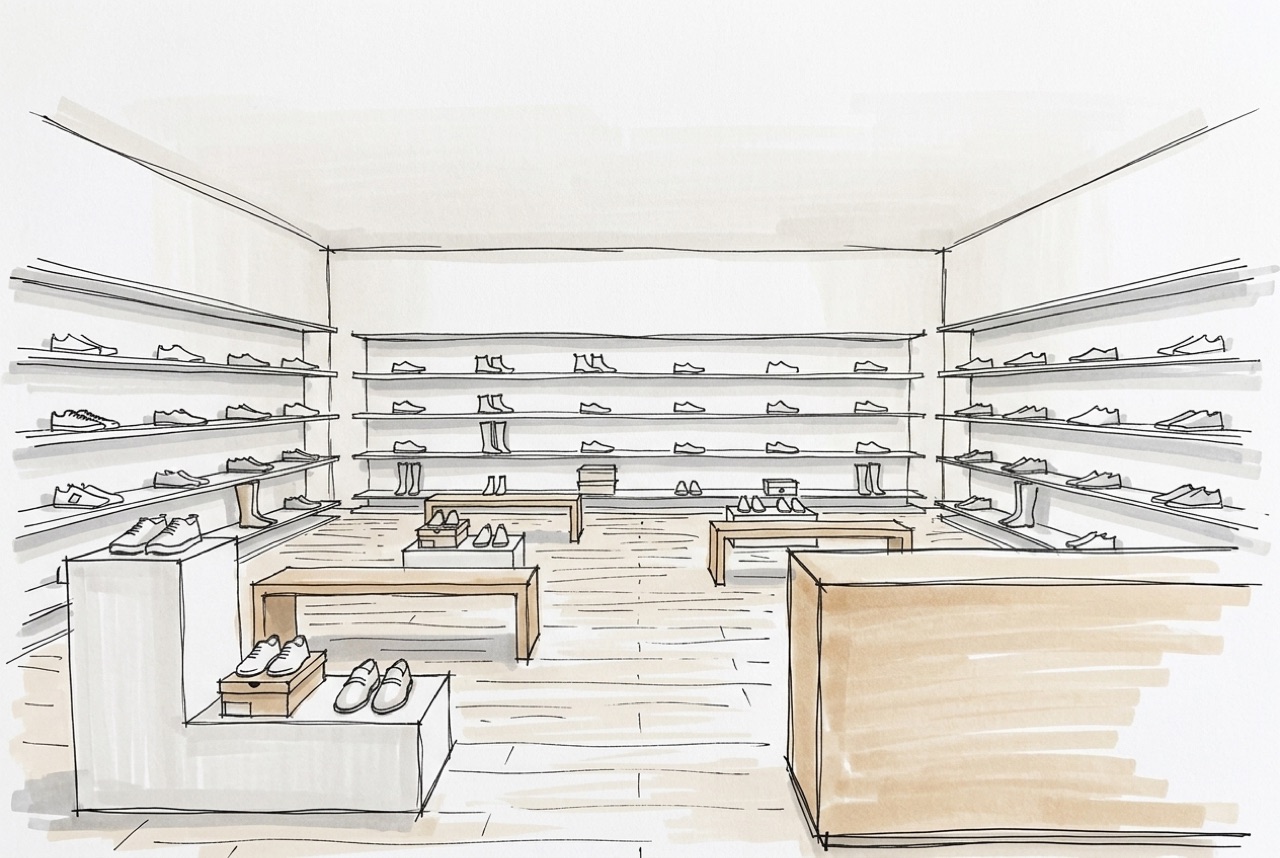
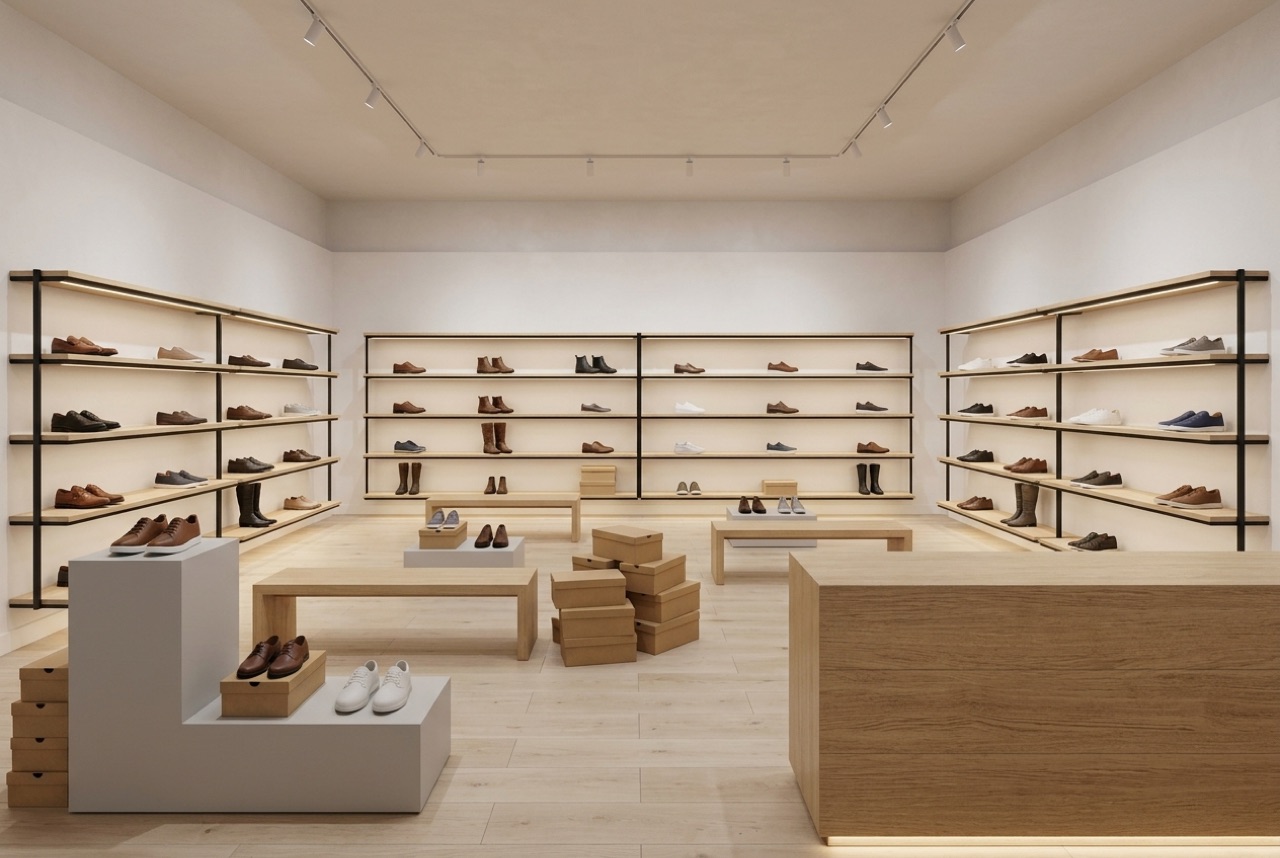
Below is a hand-drawn marker sketch of a footwear store, and what Sketch & 3D View made from it. The shelving bays, benches, the stepped plinth and the counter sit where they were drawn.
Tips for a good input view
- Frame the view you would show a client. On Precise, the camera is kept, so a good angle in gives a good angle out.
- Hide helper geometry first. Section planes, guides and labels in the export can be read as objects.
- Name materials in the prompt. “Walnut fixtures” is better than “nice wood”. Say where each material goes.
- Match the store type to the store. Leave it on Auto only if you do not mind the tool choosing the product.
- Use Creative only for rough massing. If the model is a first pass, letting the tool refine the design can help. If the design is agreed, stay on Precise.
For a model that is still empty, run the result through Restock & Merchandise, or read our guide to restocking empty shelves.
What it can't do
The result is an AI image. It is not a physically based render, so it will not give you lighting levels or exact material samples, and small details can move or appear. Check it against your model before sharing. It is not a drawing either: for dimensions, use your CAD or BIM model.
For an overview of where AI rendering fits in a design workflow, see our comparison of AI store design tools. When the design is agreed, Design Studio is where you build and edit the store itself.
Ready to try it on your own view? Open Sketch & 3D View. Free accounts start with 50 credits, enough for two renders.
FAQ
Can AI turn a SketchUp model into a photoreal render?
Yes. Export a view from SketchUp, 3ds Max, Revit or Lumion, upload it to Sketch & 3D View and describe the finishes. With Follow my layout set to Precise, the render keeps the camera, walls, openings and fixture positions of your view. Check the result against your model before you show it to a client.
Does it keep my camera angle and layout?
On Precise, that is the instruction it is given: keep the exact camera, walls, openings and fixture positions, and make the materials, lighting and product real. On Creative it treats your view as a guide and may refine the design. Either way it is an AI image, so compare it with your view.
Does it work from a hand sketch?
Yes. Set “Your input is” to Sketch and upload a scan or photo of the drawing. The example in this post was made from a hand-drawn marker sketch of a footwear store.
How long does it take and what does it cost?
The tool estimates 30 to 60 seconds per render. A render costs 25 credits, and the paid-only Fast engine adds 5. Free accounts start with 50 credits.


